🌿 In Loving Memory of Stas (Forum Pioneer)
Stas was one of the founding pillars of our gardening community. A true innovator, he was building custom LED grow lights and experimenting with light spectrums years before it became mainstream. Though he lived a quiet and solitary life, he generously shared his brilliant DIY mind and warm heart with fellow growers online. Stas passed away about a decade ago, but his legacy lives on. We keep his original cat avatar and his invaluable articles exactly as he wrote them, honoring a man without whom this community simply wouldn’t be the same.
📌 Quick Summary (TL;DR): Stas’s LED Seedling Masterclass
- 💡 Light Spectrums: Stas recommends altering the Blue-to-Red LED ratio based on plant age. 2:1 (Blue/Red) for early seedlings to build thick stems and strong roots. 1:1 after up-potting, and 1:2 to stimulate budding.
- 🌱 Initial Lighting Rule: Run lights 24/7 as soon as seeds sprout, but do not rotate the trays initially. Wait 2-3 days until the cotyledons (seed leaves) fully open and face the light, otherwise the stems will twist and strangle themselves.
- 🪟 Windowsill Hacks: Windowsills are notoriously bad for seedlings (cold from the glass, hot/dry air from the radiator below). Solutions: Drape a wet towel over the radiator, build a shelf extension to block the rising heat, and hang a reflective curtain on the room-side of the plants.
- 📏 Spacing & Containers: Grow seeds in deep 20x20x9 cm (8x8x3.5 inch) containers, spaced widely at 6×6 cm (2.5 inches) apart. This saves space under the grow lights and allows them to stay in the initial container for over 3 weeks without shading each other out.
📋 Table of Contents
My “Notes” (Things I’ve Observed)
I noticed that sprouts appear mostly at night. (As always, as soon as you discover something for yourself, it turns out someone else discovered it long before you). I later read that if seed trays are kept in bright light, germination is delayed and sprouting is less uniform. Therefore, I wait for mass germination in the dark, and then immediately place them under the grow lights.
At First, I Leave the Lights On 24/7, and I Do Not Rotate the Containers
Why?
Usually, people rotate trays to illuminate them evenly. But I do not recommend doing this at the very initial stage. The cotyledons (seed leaves) haven’t fully opened yet. If you rotate the container (say, 180 degrees), the light source is now on the opposite side, and the tiny stem starts twisting back toward the light.
Since the leaves haven’t opened yet (they haven’t “raised their heads”), the twisting stem essentially strangles itself. If the light shines steadily from one fixed position, the leaves will rise and open fully within 2-3 days. At that point, I stop the 24/7 lighting and switch to a timed schedule.
How Many Hours a Day Should Grow Lights Be On?
I anticipate your question: How long should I leave them on?
The plants will answer that for you. Let’s say you turn the lights on when you leave for work in the morning. When you get home, watch the seedlings. Note how long it takes for the leaves to start folding upward (assuming an almost vertical position). That is their signal: “We are full, we’ve had enough light, we don’t need any more, it’s time to go to sleep.” You can turn the lights off.
That is your baseline for light duration. I will add that, in my experience, every variety needs its own “dosage.” Some are perfectly happy with 13 hours, while others demand almost 17. Watch them closely, understand what they need, and trust me, they will repay your attention.
Why do I say this? Imagine you are hungry, but someone tells you to drink! It’s freezing outside, and they force you to drink ice water (while you are hungry!)… Everything is good in moderation, and at the right time. You don’t want seedlings to “live large” and grow leggy and weak (from overly rich soil, too much heat, moisture, and light), but you can’t just abandon them either. How many times have I seen people sow hundreds of tomatoes in one huge box with zero care? When asked why so many, they reply: “Well, a lot of them die off, I don’t know what they’re missing.”
Reflectors & Diffused Light
I also noticed that even a simple reflector greatly increases efficiency and kills two birds with one stone:
- First, it naturally increases light intensity (the rays don’t scatter across the room).
- Second, if you use a matte screen, the light becomes “diffused” (scattered). Diffused light is absorbed by plants much better than direct, harsh light.
For LEDs, there is another, arguably more effective option: optical lenses. The advantage is that lenses are compact (unlike bulky lamp reflectors) and come with different dispersion angles, making them very appealing. By using optics with different angles, you can customize the optimal hanging height for your specific light fixture.
I used to act as the “light switch” myself, but for the second year now, I’ve been using weekly programmable timers. They do the work for me, and I just observe… What could be better than automation doing the work for you?
Important Details (In My Opinion)
If you’ve decided to use supplemental lighting, this is for you.
What I’m about to describe is not THEORY, but my practical research (going into its third year). I wanted to find a compromise between great seedling results and the economic side (electricity consumption), which is relevant to me since I grow house flowers and run seedling experiments multiple times a year.
The decision to switch to LEDs was conscious: low electricity consumption, but MOST IMPORTANTLY, the ability to build my own custom spectral composition! I read on an African Violet forum once that by using different light spectrums, people coax out colors and shades that don’t even exist in nature! So, I started experimenting. Just not on violets.
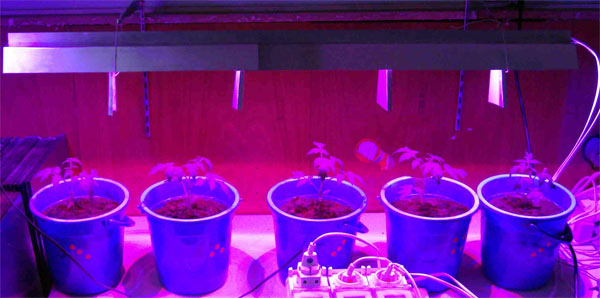
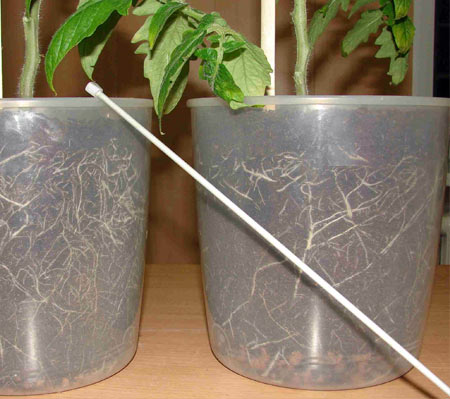
Age: about 70 days, grown in a 4.7-liter (1.2-gallon) bucket. Look at those roots!
Sowing Containers and Spacing
Let’s start with the seed sowing containers. I’ve been using food storage containers for the third year, and I’m very happy with them. My dimensions are 20 x 20 x 9 cm (approx. 8 x 8 x 3.5 inches). I drill plenty of drainage holes in the bottom, add a layer of expanded clay pellets for drainage, and then potting mix. My sowing layout is roughly 6 x 6 cm (2.5 x 2.5 inches) apart—no less!
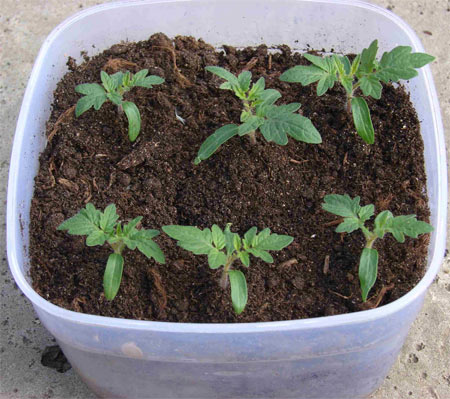
I anticipate the question: Why plant them so far apart?
I’ll explain—to save money! The seedlings are spaced out, and because the box is deep, they can grow there for over 3 weeks before needing to be pricked out (up-potted). Nothing gets in their way; the depth allows the roots to develop, and the wide spacing allows them to grow longer without shading each other.
Once you transplant seedlings into individual cups, they require a massive footprint (taking over whole windowsills) and far more lights. By keeping them in this box, I can light them with a smaller number of LEDs for an extra 7-10 days (without sacrificing plant quality). With a “comprehensive” approach—using lenses and reflective screens—the efficiency goes up even more.
Many will say: “We used to grow them without extra lights, and we always had tomatoes.” Yes, I agree, but first of all, that was back in the day (our grandparents, unlike us, actually knew how to grow things properly). Secondly, over the last 50 years, Mother Earth has been mutilated—by heavy machinery, chemicals, and ignorant specialists. Thirdly, how many people do you actually know who can grow a genuinely good harvest? When you see the sad, spindly seedlings people cart out to their gardens in the spring… well, I’d better stay quiet…
Playing with the LED Spectrum (Red vs. Blue)
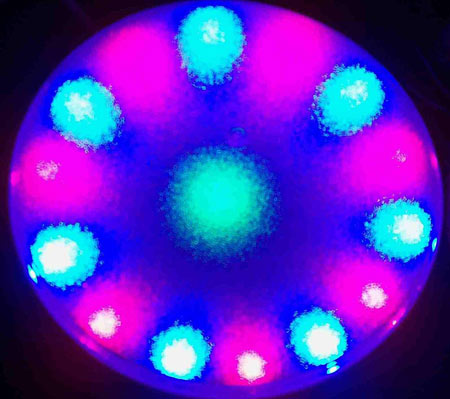
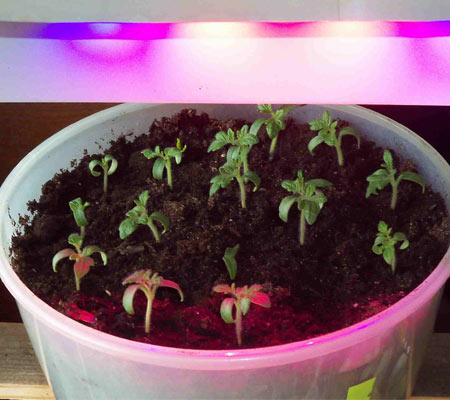
For this first stage (before transplanting), I use LEDs with a 2:1 ratio (Blue/Red).
Why? Because blue light stimulates root growth and slows down the vertical growth of the seedling. But “slowing down” doesn’t mean it stops growing; it grows wider rather than taller! The base of the stem gets thick, and the internodes (distance between leaves) stay short.
For a couple of days after transplanting (pricking out), you should reduce the light intensity. The plant babies are already in shock—they got ripped up, shoved into new dirt, and then you blast them with bright light. Once they recover, put them back on the standard timed lighting schedule. For this next period (about a month), it is better to light them at a 1:1 ratio (Blue/Red).
As they approach the budding stage, switch to a 1:2 ratio (or even more Red). I anticipate the question: Why make it so complicated?
The fact is, red light stimulates “sexual maturity,” bud development, and fruiting. With too little red, all this will still happen, but it might take significantly longer. Ultimately, I came to the conclusion that a “universal” grow light is impossible because different growth stages require different spectrums. Think about the length of the day in spring vs. summer, the sunrises/sunsets, and their duration (the natural source of red rays). Maybe you’ll agree with me.
Nowadays, thanks to programmable timers, I want to mimic reality entirely. My timers control separate circuits of red and blue LEDs. To take it further, I want the timers to incrementally increase the day length every single day, just like in nature. 🙂 I don’t know if there will be a positive effect yet, but it certainly won’t be negative. I don’t remember if I read this somewhere or came up with it myself, but the philosophy is: spy on Nature, and do exactly what she does. You won’t go wrong!
The Windowsill Dilemma & How to Fix It
For most gardeners, the “sowing season” doesn’t start in early February, and I approve of that. Why?
Because growing high-quality seedlings in an apartment is very difficult. Again, why?
Any gardening book will tell you that you need to regulate daytime and nighttime temperatures, provide supplemental light, and water/fertilize “correctly.” But who actually does that? Almost no one (myself included). Realistically, no one is going to drop the thermostat in their house to freezing at night just so the tomato seedlings feel good, while the rest of the family shivers and freezes their butts off. Therefore, I decided to find a technology that works for both me and the seedlings.
In most apartments, the temperature is higher than seedlings require, there is too little light, and people are far too generous with watering. A surplus of all three guarantees overgrown, leggy, pale seedlings. To avoid this, you need to realistically assess your environment and forecast (somehow) your plant-out date. Holding onto seedlings for an extra two weeks indoors is a losing game; the plants become severely stressed, and you’ll waste weeks waiting for them to recover in the garden.
The Typical Windowsill Problem
Seedlings growing on a plain windowsill, especially if they aren’t rotated, develop unevenly. That wouldn’t be the end of the world, but the leaves facing away from the sun don’t get enough light. To make matters worse, that room-facing side is being blasted by hot, dry air rising from the radiator (heating vent), which heavily aggravates the situation. As I mentioned before: the higher the temperature, the more light the plant demands. Tomatoes like dry air (around 60% humidity is optimal), but during heating season, apartment humidity can drop to 20%, which is way too low.
So, what do we do?
It’s not that complicated. You need to implement just two things:
First, block the hot air from the radiator. There are two options:
- Place a wet towel over the radiator and re-wet it periodically (this lowers the temperature slightly, humidifies the air, and makes the room more comfortable for you, too).
- Extend the depth of the windowsill. For example, if your sill is 10 cm (4 inches) deep, lay a false shelf over it so it overhangs and completely covers the radiator below (making it about 20 cm / 8 inches deep). Even if you can’t place plants on the overhanging edge (they might tip over), the shelf will do its job: it redirects the hot air flow away from the plants.
Second, install supplemental lighting. Crucially, install it on the room-side of the plants (the sun provides light from the window side), not directly over the middle, as many people do. If you place a grow light perfectly in the middle, you create an imbalance: the window side gets [Half the Grow Light + The Sun], which is obviously much brighter than the room side getting just [Half the Grow Light].
The absolute best (and not that difficult) solution is a reflective screen (made of reflective foil or white spunbond row cover). You hang it like a curtain on the room-side of the plants, dropping it below the windowsill (tie small weights to the bottom edge). This accomplishes several things: it blocks the hot air from the room, reflects the sun’s rays back onto the back of the plants, and creates an isolated microclimate zone with comfortable conditions and no drafts.
If you need to raise the humidity, just mist them a few times with a spray bottle. Supplemental lighting is highly desirable, especially for those starting seeds early. Right now, the natural daylight is only 8-9 hours, while my grow lights run for over 14 hours (experimentally proven to be optimal). A daily light deficit of 4+ hours will absolutely ruin your seedlings’ productivity. Think about it, decide for yourself… the choice is yours.
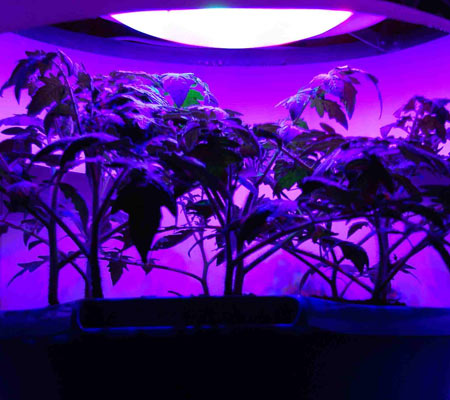
LED Wattage Specs for Vegetable Seedlings
Just a quick note: while I grow a very diverse mix—from tomatoes, peppers, and everbearing strawberries to house plants like ficus, Christmas cactus, conifers, begonias, etc.—my lights are primarily “tuned” for vegetable seedlings.
To provide “high-quality” supplemental light for seedlings, you need 30–40 watts per square meter (approx. 3–4 watts per sq. ft.). If LEDs are used as the sole light source (like in my setup, where natural light is practically nonexistent), you need around 50 watts per square meter (approx. 4.6 watts per sq. ft.). You can judge the results from the photos.
I also noticed that seedlings grown under LEDs receive some sort of “superpower boost.” Thanks to this, they can easily survive extended holding periods (up to 2 weeks for me) with absolutely no grow lights at all, just sitting on the floor waiting for the weather to warm up so they can be planted out.